And in case you prefer your muesli a little less fruity & nutty here is the original...
For as long as I can remember, breakfast at my grandparent's house has always been this muesli. Over the years I have tried out other recipes that are healthier but nothing compares with the taste of Nana's muesli - I would rather have a little bit less of something that tastes amazing than a big bowl of something very ordinary.
2 cups rolled oats
1 cup unprocessed bran
1 cup shredded coconut
100g pumpkin seeds
1/2 cup skim milk powder
1/2 cup sesame seeds
1/2 cup sunflower seeds
1/2 cup honey
60g butter
1/4 cup oil
Combine all ingredients in a large shallow dish. Bake uncovered in a slow oven for 1 hour stirring every 15 minutes. Store in an airtight container.
Serve with fruit and thick greek yogurt.
Sunday, 13 November 2011
Cherry & Almond Toasted Muesli
Last post was over a month ago, not a great start to the blog - sorry about that to anyone who might be reading! It has been a busy 6 weeks or so, my parents visited from Australia, the Mr has been working in Christchurch for weeks and work has started the manic craziness leading up to Christmas. So all in all not alot of time in the kitchen, oh and somewhere along the way I've lost my camera so we'll be photoless for awhile until I find it.
So while things have been pretty busy, I have committed to myself that I will eat a healthy breakfast every single day - no more muffins from the cafe at work for me! Once the warmer weather hits, my breakfast of choice is toasted muesli, fruit & yogurt. Now I know that untoasted muesli is healthier but I'd rather have a little less of something that tastes really good! I am a fussy girl, don't like peanuts and don't like raisins and it appears 99% of supermarket muesli includes one or both so the only solution really is to make my own! It really is a doddle to do, yes it takes a bit of time in the oven but not much hands on time. I usually throw all the dry ingredients in a mixing bowl on a saturday night then when I get up in the morning it's just a matter of stirring in the wet ingredients and popping in oven and doing something like the laundry in between stirring.
This recipe is based on my Nana's muesli with a few changes for a different flavour and using what I had to hand.
3 cups wholegrain rolled oats
1 cup oatbran
100g pumpkin seeds
1/4 cup sesame seeds
70g sunflower seeds
150g almonds (some I chopped roughly, some left whole)
1/2 cup honey
60g butter
1/4 cup oil
150g dried cherries
Combine all but the cherries in a large shallow dish. Bake uncovered @ 160 degrees C for approx 1 hour stirring every 15 minutes until golden - it will continue browning for awhile after it comes out of the oven so take it out just before you think it's perfect. Let cool in the pan then stir in the dried cherries and store in an airtight container.
Instead of Cherry & Almond what about....:
- Mango, Coconut & Macadamia - add 1/2 cup shredded coconut, replace cherries & almonds with dried mango & macadamias.
- Apple & Cinnamon - add cinnamon while still warm from the oven and diced dried apple
- Blueberry & Pecan....really any dried fruit & nut combo you can come up with will be delicious!
Sunday, 2 October 2011
What's In Season....Rhubarb
I love spring, mostly because I start feeling my extremities again after a cold winter but I also loooove that rhubarb is at its best now. That jewel red vegetable that pretends its a fruit. So what better to start what I hope will be a regular feature: What's in Season.
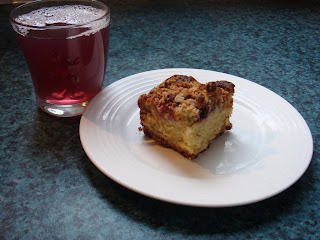
My rhubarb plant was rescued from the neighbours a couple of months ago so isn't very big yet but I couldn't resist picking it bare so I could get busy in the kitchen. Unfortunately my little plant only netted a paltry 50grams but luckily the local fruit & veg store had beautiful big bunches for $1.99. So this afternoon I've been having a rhubarb extravaganza in the kitchen making rhubarb syrup and rhubarb & raspberry crumble cake.
Rhubarb Syrup
450 grams chopped rhubarb
1 tsp vanilla bean paste
1 cup sugar
1 cup water
Combine all ingredients in a large pot and simmer until rhubarb softens, about 10-15 mins. Strain through a muslin lined sieve and pour into a bottle/jar. The leftover pulp is delicious so don't throw it away - it'd be great over yogurt or whizzed with yogurt and frozen in popsicle moulds as rhubarb popsicles.
The syrup can be used in cocktails or diluted 1 part syrup, 3 parts soda water.
Note!! Do not use a metal sieve - my syrup reacted with the sieve and started to turn blue and has a not so pleasant metallic after taste so do as I say not as I do...
After the rhubarb syrup mishap I still had some rhubarb leftover. I also had some crumble topping in the fridge I wanted to use up. I make up a bulk lot of crumble topping and it keeps quite happily in the fridge in an airtight container for months. So aha I thought, rhubarb crumble cake sounds pretty good. I didn't have enough rhubarb so it became:

Rhubarb and Raspberry Crumble Cake (adapted from a recipe from "The Free Range Cook" by Annabel Langbein)
140g softened butter
1 cup sugar
2 eggs
3/4 cup milk soured with a squeeze of lemon (the original recipe calls for yogurt so feel free to use that or buttermilk)
2 cups flour
3 tsp baking powder
1/2 tsp baking soda
1 cup chopped rhubarb
1 cup frozen raspberries
1 1/2 cups Crumble topping
Preheat oven to 180 degrees C. Line a 25cm round or 20cm square cake tin with baking paper. Beat the butter and sugar until pale and fluffy. Add the eggs and vanilla and beat well. Beat in the milk, then fold through the sifted flour, baking powder and baking soda. Spoon into the prepared tin and spread into an even layer, sprinkle the rhubarb and raspberries evenly over the top and then sprinkle with the crumble topping.
Bake for 50-60 minutes until the cake is golden and a skewer inserted in the middle comes out clean. Stand for 15mins before cooling on a rack.
My rhubarb plant was rescued from the neighbours a couple of months ago so isn't very big yet but I couldn't resist picking it bare so I could get busy in the kitchen. Unfortunately my little plant only netted a paltry 50grams but luckily the local fruit & veg store had beautiful big bunches for $1.99. So this afternoon I've been having a rhubarb extravaganza in the kitchen making rhubarb syrup and rhubarb & raspberry crumble cake.

Rhubarb Syrup
450 grams chopped rhubarb
1 tsp vanilla bean paste
1 cup sugar
1 cup water
Combine all ingredients in a large pot and simmer until rhubarb softens, about 10-15 mins. Strain through a muslin lined sieve and pour into a bottle/jar. The leftover pulp is delicious so don't throw it away - it'd be great over yogurt or whizzed with yogurt and frozen in popsicle moulds as rhubarb popsicles.
The syrup can be used in cocktails or diluted 1 part syrup, 3 parts soda water.
Note!! Do not use a metal sieve - my syrup reacted with the sieve and started to turn blue and has a not so pleasant metallic after taste so do as I say not as I do...
After the rhubarb syrup mishap I still had some rhubarb leftover. I also had some crumble topping in the fridge I wanted to use up. I make up a bulk lot of crumble topping and it keeps quite happily in the fridge in an airtight container for months. So aha I thought, rhubarb crumble cake sounds pretty good. I didn't have enough rhubarb so it became:

Rhubarb and Raspberry Crumble Cake (adapted from a recipe from "The Free Range Cook" by Annabel Langbein)
140g softened butter
1 cup sugar
2 eggs
3/4 cup milk soured with a squeeze of lemon (the original recipe calls for yogurt so feel free to use that or buttermilk)
2 cups flour
3 tsp baking powder
1/2 tsp baking soda
1 cup chopped rhubarb
1 cup frozen raspberries
1 1/2 cups Crumble topping
Preheat oven to 180 degrees C. Line a 25cm round or 20cm square cake tin with baking paper. Beat the butter and sugar until pale and fluffy. Add the eggs and vanilla and beat well. Beat in the milk, then fold through the sifted flour, baking powder and baking soda. Spoon into the prepared tin and spread into an even layer, sprinkle the rhubarb and raspberries evenly over the top and then sprinkle with the crumble topping.
Bake for 50-60 minutes until the cake is golden and a skewer inserted in the middle comes out clean. Stand for 15mins before cooling on a rack.
Saturday, 1 October 2011
Triple Chocolate Muesli Bars

Typical Auckland spring weather today, mostly overcast with a sprinkle of rain just to make it that little bit more unpleasant. So today instead of getting out into the garden as hoped I've spent the day tidying and organising the pantry. Maybe I'm the only one who ends up with small amounts of forgotten things in the back of the pantry - a handful of cocoa pops, that last little bit of coconut that won't fit in the container etc. This recipe is perfect for this predicament. It is a fantastic way to use up all those leftover bits of muesli and cereal in the pantry and has infinite variations. Today I made a double chocolate version that is the best yet. This recipe is based on one by Sophie Gray called Muesli Bar Magician. It works with all sorts of muesli/granola and cereal - so delicious using the homemade muesli I will be posting soon or as I usually do a mix of all sorts.
200g butter
1/2 cup golden syrup (if you don't have golden syrup you could use honey)
5 cups muesli/cereal (today this was made up of 1/2 cup cocoa pops, 1 cup crushed special K, 3 cups toasted muesli and a final half cup made up of sultanas, coconut and a few rolled oats to make up the 5 cups)
1/2 cup chocolate chips
1 cup plain flour
1/2 cup cocoa
1/2 cup sugar
1 Tbs baking soda
1/4 cup boiling water
100g white chocolate
Preheat oven to 180 degrees C. Line a 33cm X 24 cm sponge roll tin with baking paper. Melt the butter & golden syrup together in a large bowl. Dissolve the baking soda in the water and add to the butter/syrup mixture, add all other ingredients except for the white choc and mix well.
Using wet hands press the mixture into the prepared time and roll firmly over the top with a can to compress the mixture. Bake for 12-15 minutes until golden and firm. Cool in the tray. While the slice cools melt the white chocolate then drizzle over the slice. When the choc has set, slice into bars and enjoy. These freeze well so I have 5 lovely little packages for school lunches this week and the rest are in the freezer for another time.
Saturday, 24 September 2011
Homemade in NZ
Spring is in the air at last so what better time to start this blog. So what's this blog all about then? I'm all about eating fresh, seasonal food made at home rather than bought from the supermarket in a packet where you need to be a scientist to decipher the ingredients list. I'm not militant about it, I work full time and have a family to wrangle so it's not always practical but I'm working on making it a more natural part of our lives. We bought a house 9 months ago so my long term goal is to grow 90% of our fruit & vegetables in our small urban backyard. I've made a start earlier this year with fruit; planting feijoa trees, blueberries, chilean guavas, strawberries, passionfruit, and citrus and have in the last couple of weeks started planting lettuce, mesclun, basil, beans, beets and purple brocolli. Given we've got a new mortgage to hit we've not got buckets of money to spend on setting up the garden so its a bit slowly slowly but we'll get there and I hope you'll get something out of this adventure too
Subscribe to:
Comments (Atom)